It’s that time of year again. The weather is starting to warm up, and the sun is lasting longer throughout the day. It’s no surprise with all this newfound energy we also want to get to cleaning the house. But, that’s not the only thing you want to focus on cleaning! You’ll want to optimize your computer as well!
Your electronics are equally as important in maintaining. As they age, they tend to slow down. However- a lot of this isn’t exactly due to your computer getting “worse” as you use it more. (While there is some degradation of hardware, it often is minimal and compiles over many years.) Instead, unless you are attempting to run programs demanding optimized performance from newer systems, the slowness of your computer is mainly attributed to software cluttering.
So how do we fix this?
STEP 1: Cleaning by Removing Software You Don’t Use
Chances are, the longer you’ve used your computer, the more you’ve downloaded on it. A lot of it is software you might not use anymore!
In order to remove some software you don’t use easier:
On Windows:
Go to Start > Settings > Apps > Apps & Features
On Mac:
Go to Launchpad > Right Click > Move to Trash
If your space isn’t exactly being eaten up by software you can just delete, try utilizing an external hard drive. Not only can you store more, but they also can provide important backups to your computer’s files, just in case.
STEP 2: Run A Disk Cleanup
Your hard disk is an integral part of maintaining your computer’s speed. It also likes to store temporary files that build up overtime that you don’t quite need. Cleaning it out from time to time will optimize your hard drive’s performance!
There are two main ways of doing this:
Way 1: Disk Cleanup Tool
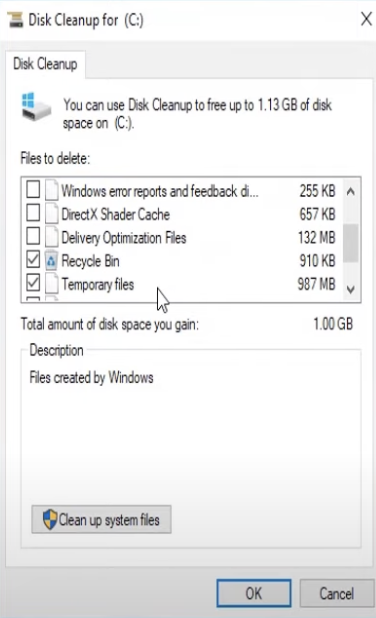
Most computers come integrated with a disk cleanup tool. It allows you to search your disk and clean up unneeded files safely and effectively.
To open it up on Windows:
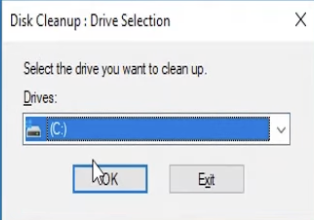
Look up “Disk Cleanup” in your search bar.
There, you can click the drive you want to clean, which most often is your “(C:)” drive.
On this screen, click on any file types you’d like to delete, and then press “OK.”
Way 2: Check Disk Commands
You can also use the check disk commands to repair your drives as well! Check disk commands allow you to check your hard drives to get a diagnosis of their health.
To run Check Disk:
> Open command prompt
> Type “chkdsk (drive)” /f /r /x
Now, what exactly are these commands doing?
/f: This parameter fixes any errors on the disk.
/r: This parameter locates any bad sectors on the disk itself, and recovers any readable information.
/x: This parameter forces the volume to dismount first, if needed.
Check out here for a full list of chkdsk commands!
STEP 3: Run a Malware Scan
You can have Malware and not even know it! Even if you don’t directly have Malware either, you could be infected with PUPs.
Potentially unwanted programs- or “PUPs”, are programs that are often labeled as being unnecessary. Think of them like spam in your email box. While they might not be directly malicious, they’re taking up unnecessary space without serving a direct purpose. Sometimes they can be put on your computer as a package deal with other software that you did want to download. At their worst, they are pieces of adware or spyware.
Norton is a widely recognized option for antivirus software, but you can also use Malwarebytes for free.
It’s always a good idea not only to have an antivirus software running for live protection. Plus, there’s nothing wrong with scanning every once in a while to make sure everything is still running smooth!
STEP 4: Update! Update! Update!
Overall, you want to make sure that everything on your computer is up to the latest version. Manufacturers are always patching security issues. Also- if you’re running out of date hardware, you might be missing out on key optimization features, which can build up to your computer feeling slower.
Make sure that you are up to date on updates with both your:
- Graphics Drive
- Most graphic drives have their own software, for example, if you had NVIDIA, go through NVIDIA’s software in order to update!
- Operating System Updates
Most operating systems, such as Windows, include all of the updates you need other than your graphics card, but to manually update all your drives, check out this guide.
STEP 5: Defragment Your Disk
Your disk begins to slowly “fragmentize” itself- which slowly de-optimizes its performance. To explain how it works:
- You delete a small piece of software.
- This creates an empty amount of space in your drive.
- You download a larger software- maybe a video game.
- The drive fills in this empty space, but maybe the video game isn’t small enough to fill that space.
- The rest of that game is placed in a different space.
- The more this happens, and the more “fragmentized” the drive becomes, the slower it is to find those files.
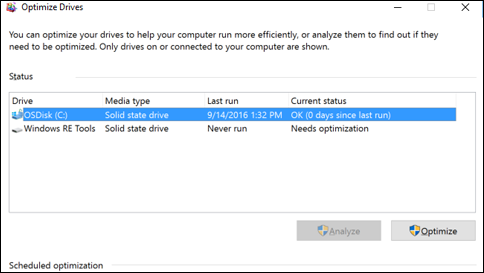
Luckily, most PCs come with their own defragmentation software, which does some cleaning on the disk itself.
To do this:
Search in the taskbar: “Defragment and Optimize Drives”
Open up the software.
Select what drive you want to optimize.
Hit “Optimize.”
STEP 6: Cleaning your Hardware too!
Hardware is equally as important to cleaning up as your software is! However, they should also be cleaned carefully. Here are the proper ways to clean different parts of your hardware:
Keyboard
- Make sure everything is completely unplugged. If you can take off your keycaps (such as with a mechanical keyboard), do so.
- Turn the keyboard upside down and shake it out to get any large particles out of it.
- Use compressed air to get in between all of the keys. If you don’t have compressed air, while not effective, q-tips can also be utilized.
- To clean the faces of the keys, use a damp cotton ball, paper towel, or cloth with rubbing alcohol and wipe them over.
Mouse
- Clean the top and bottom of the mouse with rubbing alcohol on a damp cloth.
- When using a mechanical mouse- you can also remove the tracking ball by taking the ring off (rotating it counter clockwise). There, you can use rubbing alcohol on a damp cloth to once more clean it.
- Make sure all parts are dry before reassembling and plugging back in!
Monitor
- To clean off your monitor, wipe with a damp cotton cloth or paper towel. Do not put any liquids or spray anything directly onto it!
Tower
- To clean off your PC tower, use an antistatic cloth to wipe off any dust that might’ve built up on the outside. You can use compressed air on any vents.
Re-Apply Thermal Paste
A common hardware related reason why computers are slowing down is due to it overheating. It wouldn’t be out of the ordinary for that to be due to hardened thermal paste.
For an in-depth breakdown on how to apply thermal paste, check out this article by Intel.
Sources
https://www.avg.com/en/signal/how-to-use-chkdsk-windows
https://edu.gcfglobal.org/en/computerbasics/keeping-your-computer-clean/1/

By Cierra Rossi ’27, Writing and Publishing
Cierra Rossi has been passionate about writing since she was young, specializing in creative writing and story-focused pieces.